Video links:
See the T-700 in action in the videos listed below:Original release (ICE Tech)
Long distance flight challenge featuring the T-700 (SL Aviation Network)
Update to v1.3 introducing the FMS feature (ICE Tech)
FMS & Autopilot Tutorial (SL Aviation Network)
Features:
- realistic flight model
- smooth handling
- dynamic flight controls
- HUD & dash instruments
- integrated SA GPS/transponder
- compatible with SA KellyFuel pump v3.1
Version 1.4 includes:
- Autopilot (ILS capable)
- simple Flight Management System (FMS)
- HSI/DME/GPS navigation
- GTFO! ready
- passenger/cargo modes
- N-numbers
- failures (optional)
Contents
- General Notes
- Systems/Avionics
- FMS & Instrument Flight
- Autopilot
- Fueling
- Annunciator panel & Failures
- Flight Characteristics & Notes
- Normal Operations
- Emergency Procedures
- Chat Commands
- Acknowledgements
General Notes
Rudder control: In both Mouselook and External view, Rudder is controlled by clicking and holding the left mouse button, together with left/right stick input (arrow keys or a/d). In external view, Shift + left/right input controls rudder as well.
Stalls/spins: The aircraft is optimized for stall/spin training and VFR flight. In case of low RPM or engine failure, the autofeather system will activate. This will reduce drag and enable the aircraft to glide for an emergency landing (see relevant section below).
Mouselook flight: This aircraft was designed to be flown in Mouselook using the instruments on the dashboard. If you prefer to fly from the external camera view, the HUD will provide you with the main flight instruments.
Checklists: Use the provided checklists to become familiar with normal procedures.
Personalization: The emphasis on this aircraft is primarily on its flight behavior and less on appearance. There is no paint kit option at present. However, parts of the aircraft can be painted in RGB colors using the color HUD provided. The aircraft is modifiable, so additional links may be added (e.g. decals) to further personalize it. The default version already includes some optional decals (aft left and on the tail). You may replace the textures with your own, turn them transparent, or unlink them at will (reset all scripts after each link/unlink operation).
Modifications: Please do NOT rescale the aircraft, NOR modify the names or description fields of existing links, or it will break. Do NOT remove any existing links. Make sure any additional links you add have unique names, different to the ones of already present links. There is a simple way to swap between passenger and cargo variants without the need to unlink (see chat commands below). Reset all scripts after any linking/unlinking.
Systems/Avionics
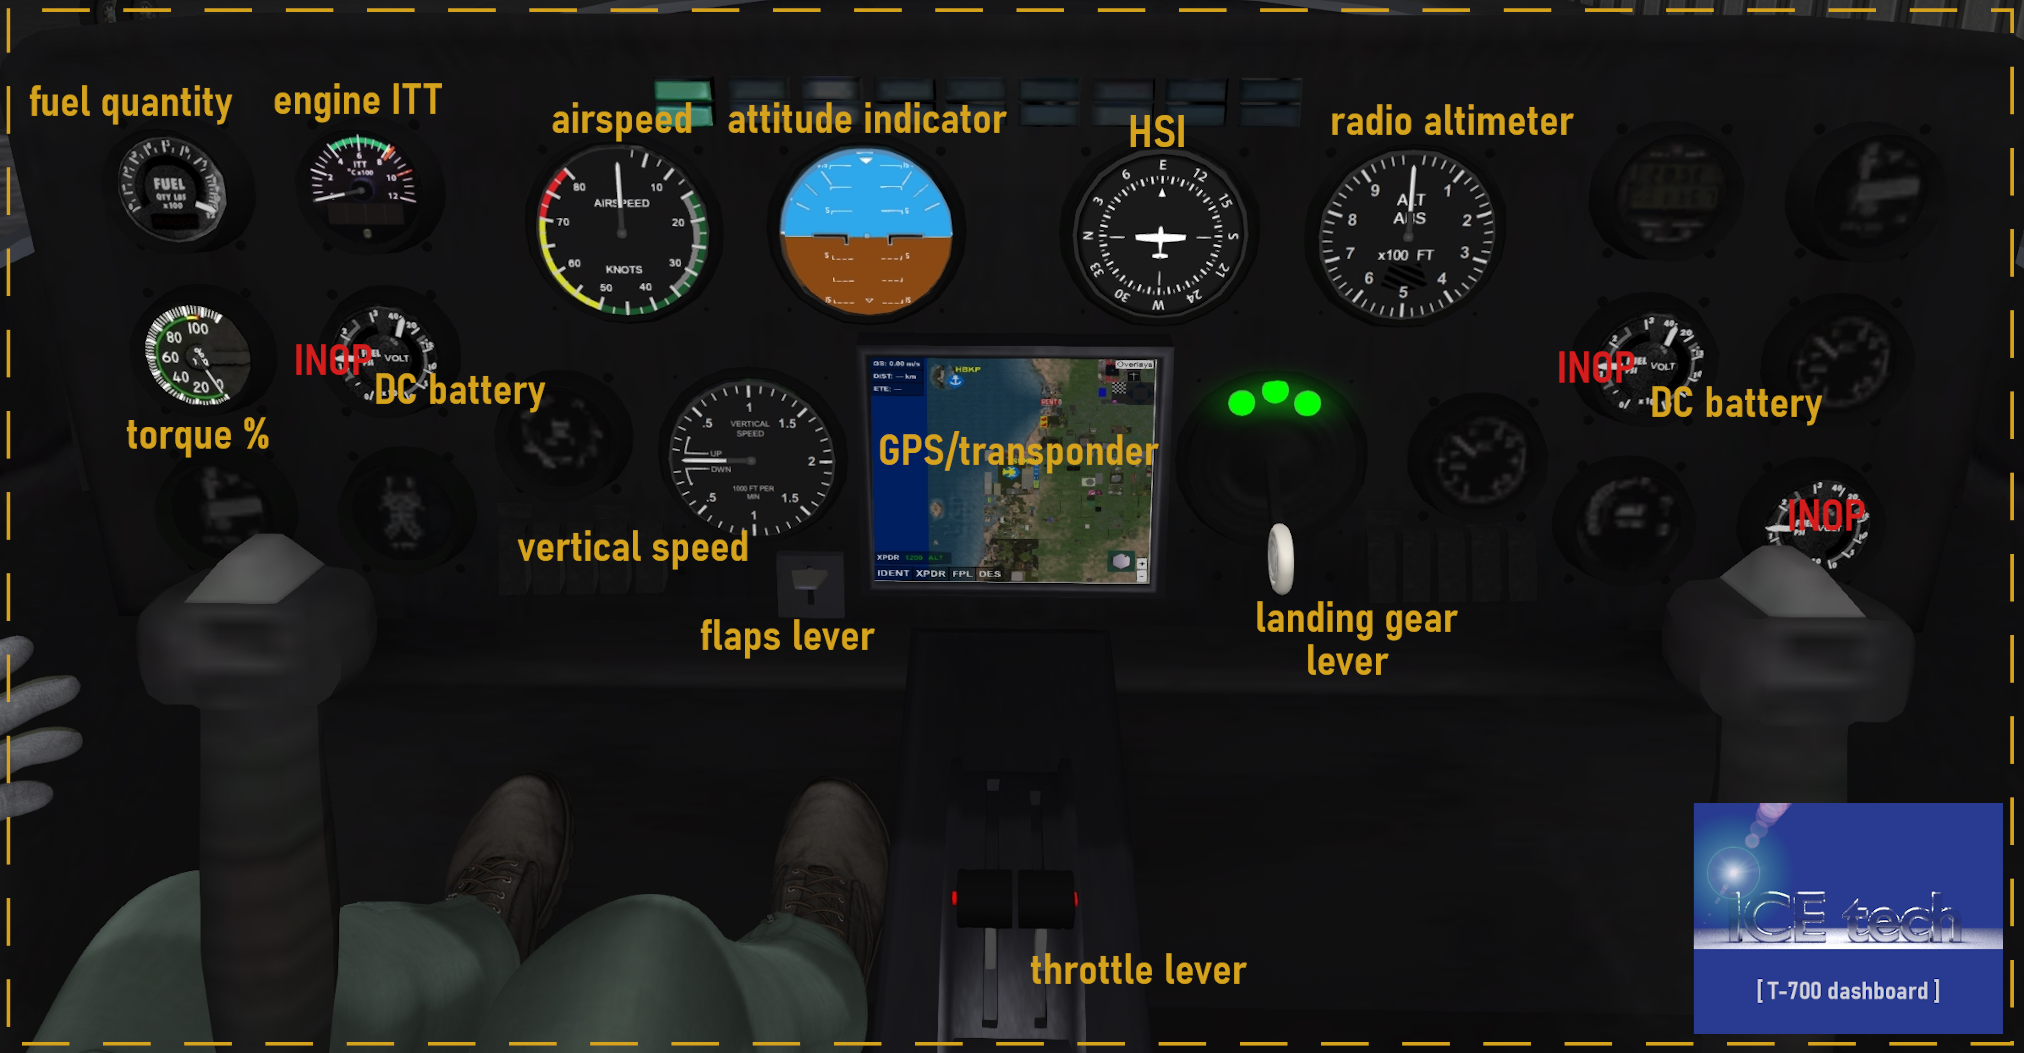
-
Fuel quantity reading in percent (%). For the KellyFuel pump, this is simulated as max 150 gallons JPA.
-
Torque (%) gauge is simulated here as the throttle setting readout.
-
DC Battery gauge. At least 20V is required for the engine starter. The battery bleeds out (faster or slower depending on what you turn on). If it drops below 20V, use external power for startup.
-
Engine ITT gauge (interstage turbine temperature). Monitor during flight and ensure it does not exceed limits for more than 2 minutes. (see Failures section below) Always check ITT before engine start. ITT will momentarily exceed limits during engine start, but for less than 30 seconds, then reduce back to the green area of the gauge. If the engine was previously running, allow time for ITT to drop to zero, before starting the engine. Failure to do so may result in a "hot start" and lead to engine damage or overheating.
-
Airspeed indicator in knots.
-
Attitude indicator. Each line corresponds to 5 degrees pitch, as marked.
-
HSI (horizontal situation indicator). More about this in the FMS section below.
-
Radio altimeter in hundreds of feet. This is the distance below the aircraft until the first obstacle is encountered. (SL land, SL water, or other rezzed objects)
-
Vertical speed in thousands of feet per minute (fpm), e.g. the 0.5 reading corresponds to 500 fpm's.
-
GPS/Transponder, powered by Shergood. More information on its operation can be found in the Shergood webpage.
FMS & Instrument Flight
The T-700 v1.3 includes a simplified flight management system (FMS) allowing for flight route programming and waypoint tracking, linked to the horizontal situation indicator (HSI) and the distance measuring (DME) instrument. In addition to serving as a heading indicator, the HSI allows tracking ILS localizers and GPS fixes and, furthermore, turns into a course deviation and glideslope indicator for ILS approaches. As for v1.4, the FMS can be coupled to servos (see the Autopilot section below). However, even with servos uncoupled, the system provides navigational aid and can be a significant help for approaches.
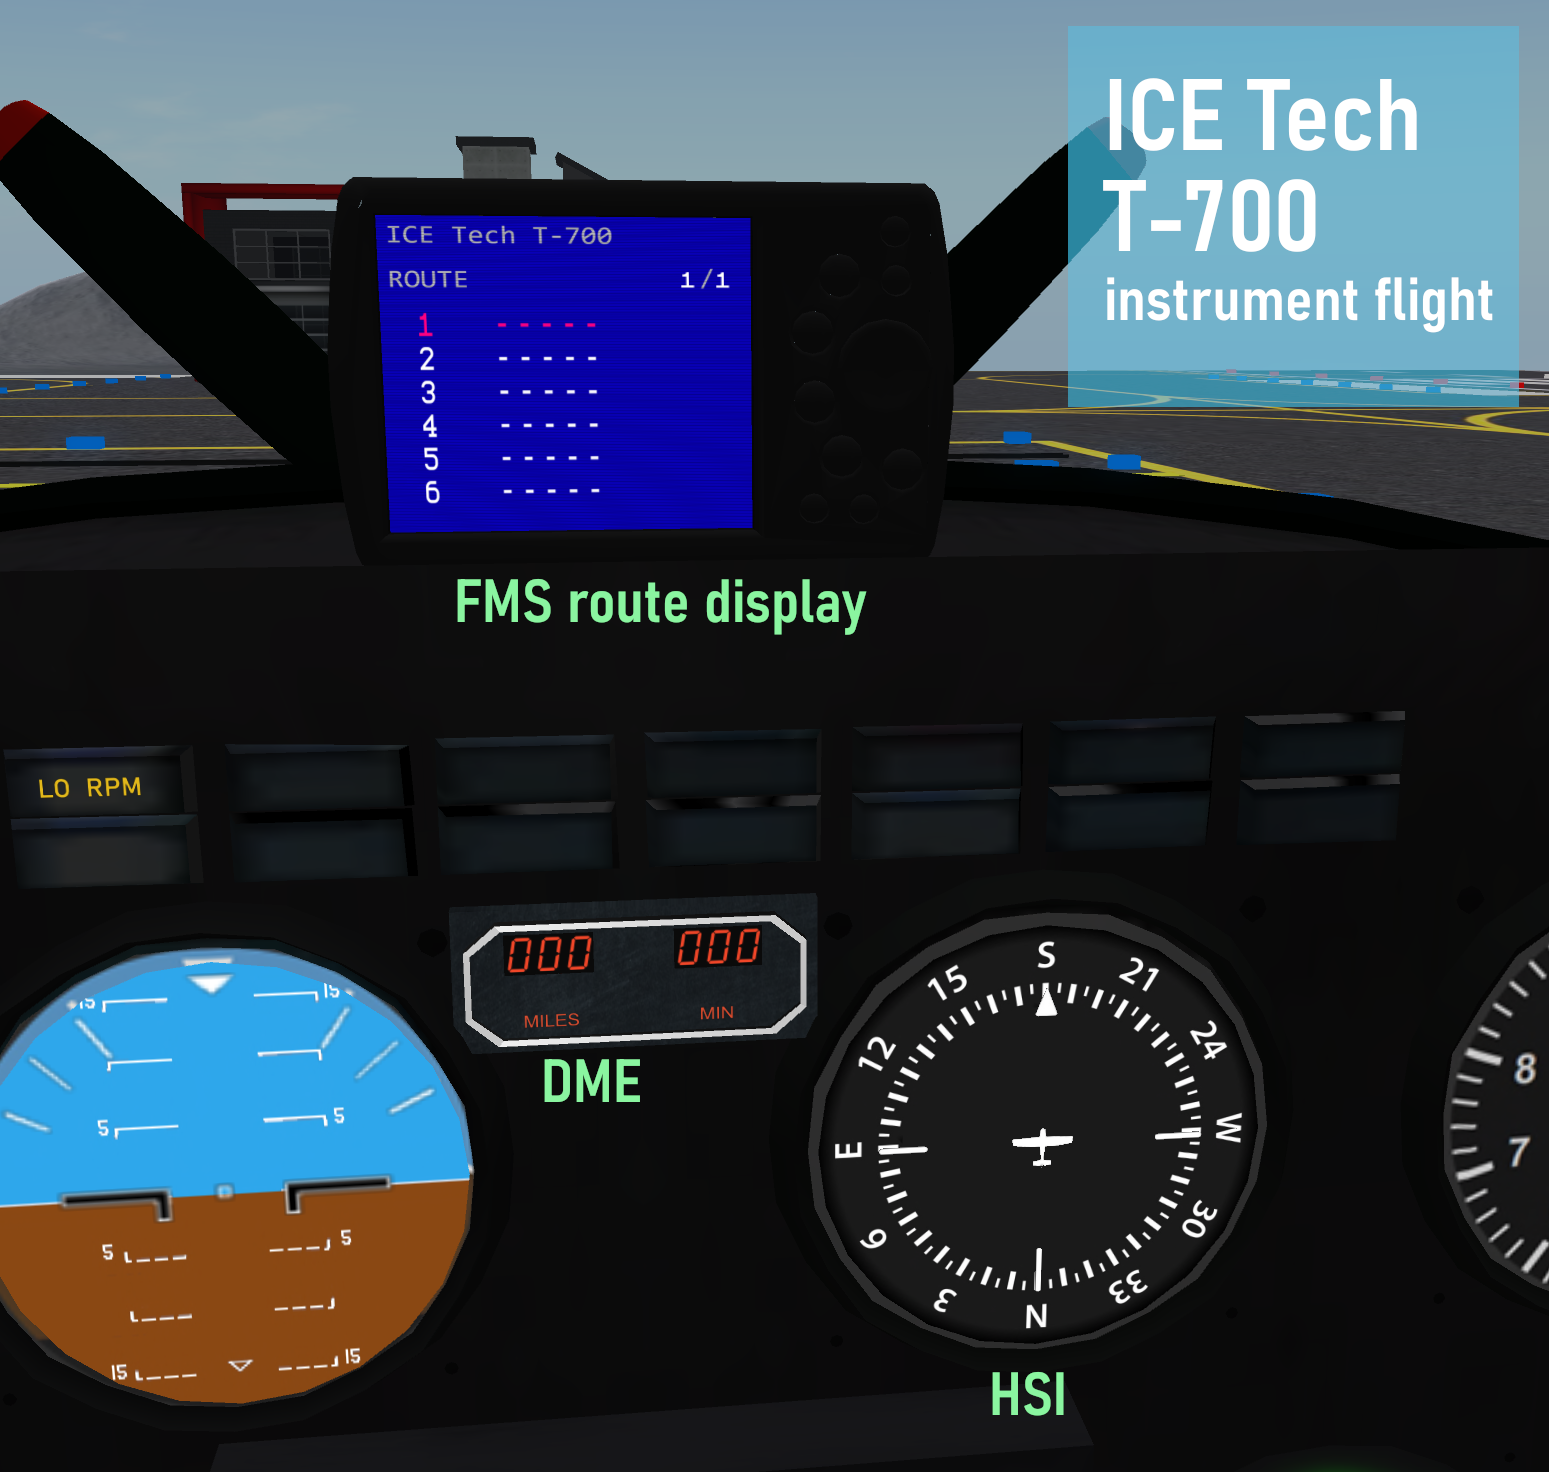
The FMS turns on automatically by turning on the GPS (local chat command gps).
Waypoints may be programed into to the FMS, using the codes in the Shergood radar webpage. Valid entries are 3-letter VORs, 4-letter airport ICAO codes (e.g. SLSN), 5-letter fixes (e.g. CARIB), or 4-letter sim codes (e.g. XEJ7). The latter can be obtained from the radar webpage by simply clicking on the sim of interest.
The desired list of waypoints can be entered into the FMS in the format plan XXXX, XXXX, XXXX, XXXX, where XXXX stands for the above mentioned codes, separated by commas. For example, the command
-
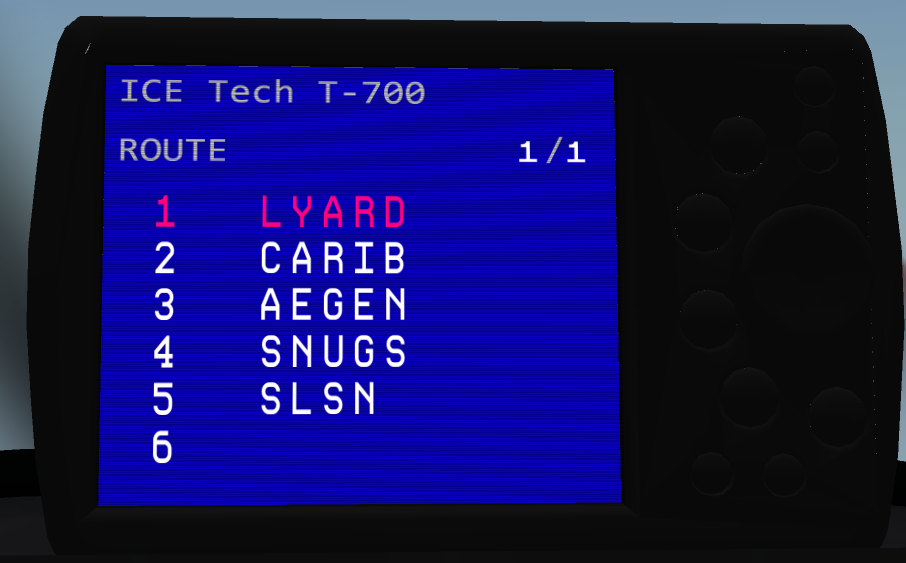
plan LYARD, CARIB, AEGEN, SNUGS, SLSN
will track the waypoints LYARD, CARIB, AEGEN, SNUGS (fixes) and, finally, SLSN (airport). The FMS supports up to 30 waypoints per route.
-
Before a route is entered, the HSI practically works as a heading indicator. As soon as the route is entered, the (numbered) route legs will appear on the FMS display screen. Waypoint #1 will appear in magenta color to indicate the currently active waypoint. Simultaneously, a white needle will now appear on the HSI, showing the direction to the waypoint. As soon as the aircraft enters a 100 meter range from the waypoint location (usually the sim center), the FMS will automatically advance to the next waypoint on the route plan (accompanied by a local chat notification).
The route can be replaced at any point during flight by entering a new route. Alternatively, a series of chat commands allow advancing to the next waypoint, directly advancing to a desired waypoint in the route plan, or adding a new waypoint entry.
- To advance to the next waypoint of the plan, use the command wpt next.
- To directly advance to a given waypoint, the chat command is wpt dto #, with # being the desired waypoint number (as displayed on the route legs screen).
- To remove a waypoint from the plan, use wpt del #, where # is the number of the waypoint to be deleted.
- To add a waypoint with code XXXX in a new line after the waypoint numbered #, type wpt add XXXX #.
The top right corner of the route screen displays the page number in the format # / #, where the first number is the current page, and the second number is the total number of pages. To display the desired page number, type p#. For example, the command p2 displays page 2 of the flight route screen.
For each active waypoint, the DME screen will indicate the distance to the active waypoint (in nautical miles), as well as the time (in minutes) to reach that waypoint along a direct path flown at the present airspeed. For example, a reading of 1.5 min in the DME instrument means that the aircraft will reach the waypoint in 1 minute 30 seconds, if it flies directly at it at the present airspeed.
Instrument approaches can be easily programmed in the FMS by appending the desired runway after the ICAO code of the destination airfield. The required format is XXXX.RW## where XXXX is the 4-letter ICAO code of the airfield and ## is the runway number. Note that the runway number for the approach must be entered precisely as shown in the Shergood radar (or in the Instrument Approaches section). For example, we can modify the previous plan to include an instrument approach for runway 09R in Second Norway, by typing:
-
plan LYARD, CARIB, AEGEN, SNUGS, SLSN.RW09R
After the final waypoint prior to the destination airfield is reached, and as long as the runway is within a 5 sim range, the HSI will automatically switch to ILS mode.
-
In ILS mode, the HSI will no longer display the direction of the airfield, but will change into a yellow course deviation indicator (CDI), together with a light blue diamond-shaped glideslope indicator. The yellow CDI needle will display the final approach heading as well as the course deviation for alignment with the selected runway.
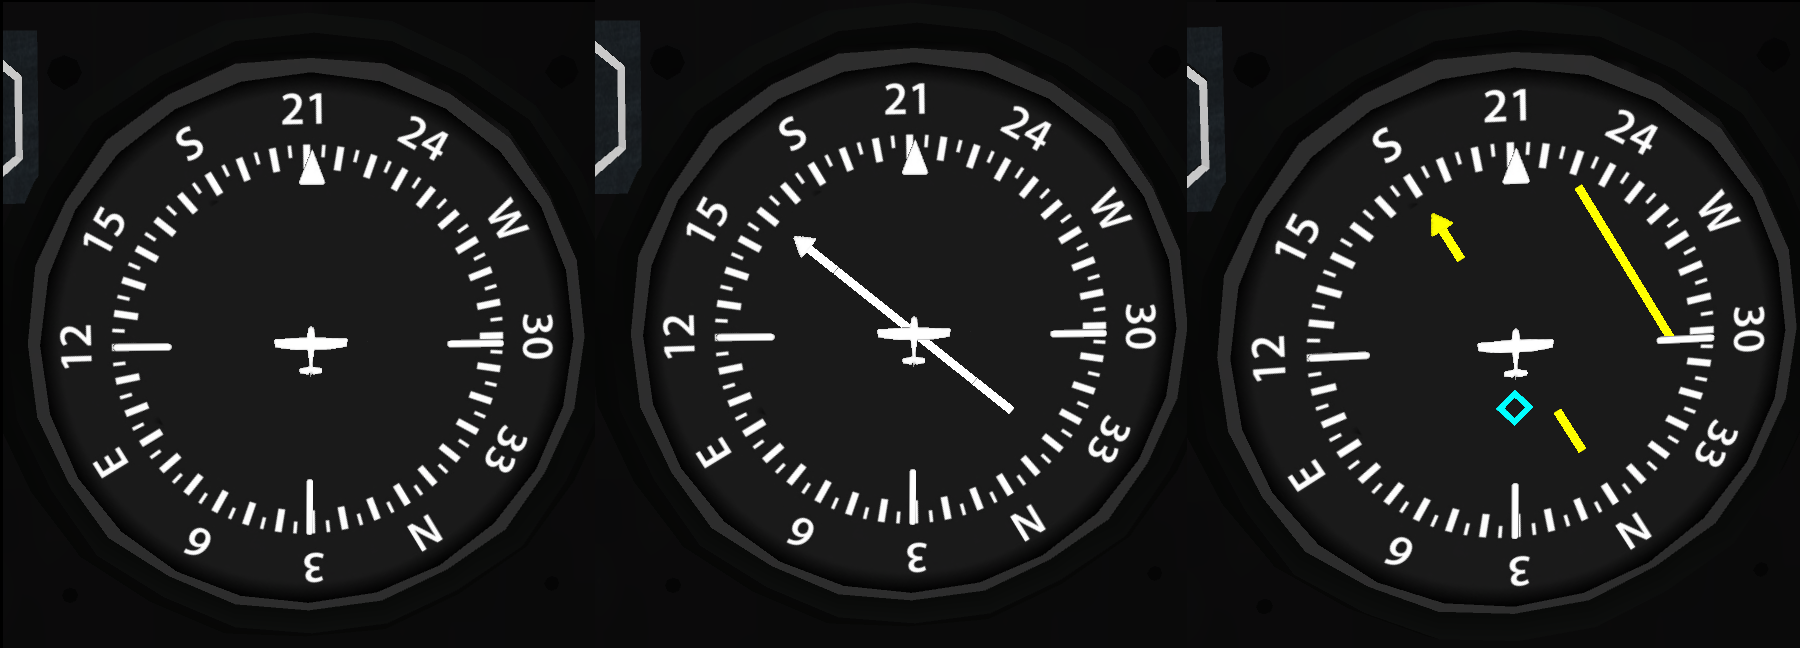
For an ILS approach, the aircraft should typically start at 50% power fully configured (flaps extended, gear down) at an approach altitude of around 100 meters above runway elevation. Within 5 sims from the runway, the HSI will switch into ILS mode. The glideslope diamond should be near the top of the HSI. Focus on alignment and monitor the glideslope indicator. Once the diamond reaches the center of the instrument, drop power to 45% and aim to remain just a tad above glideslope. Normally, no pitch correction will be needed, as the plane's nose will start to drop slowly below the horizon on its own. Adjust power as needed to remain just above (or on) the glideslope indicated by the light-blue diamond. Power down to 40% just prior to crossing the treshold (or, as required), and prepare for the flare.
To clear the FMS and the HSI link after landing, use the command ils off.
Autopilot
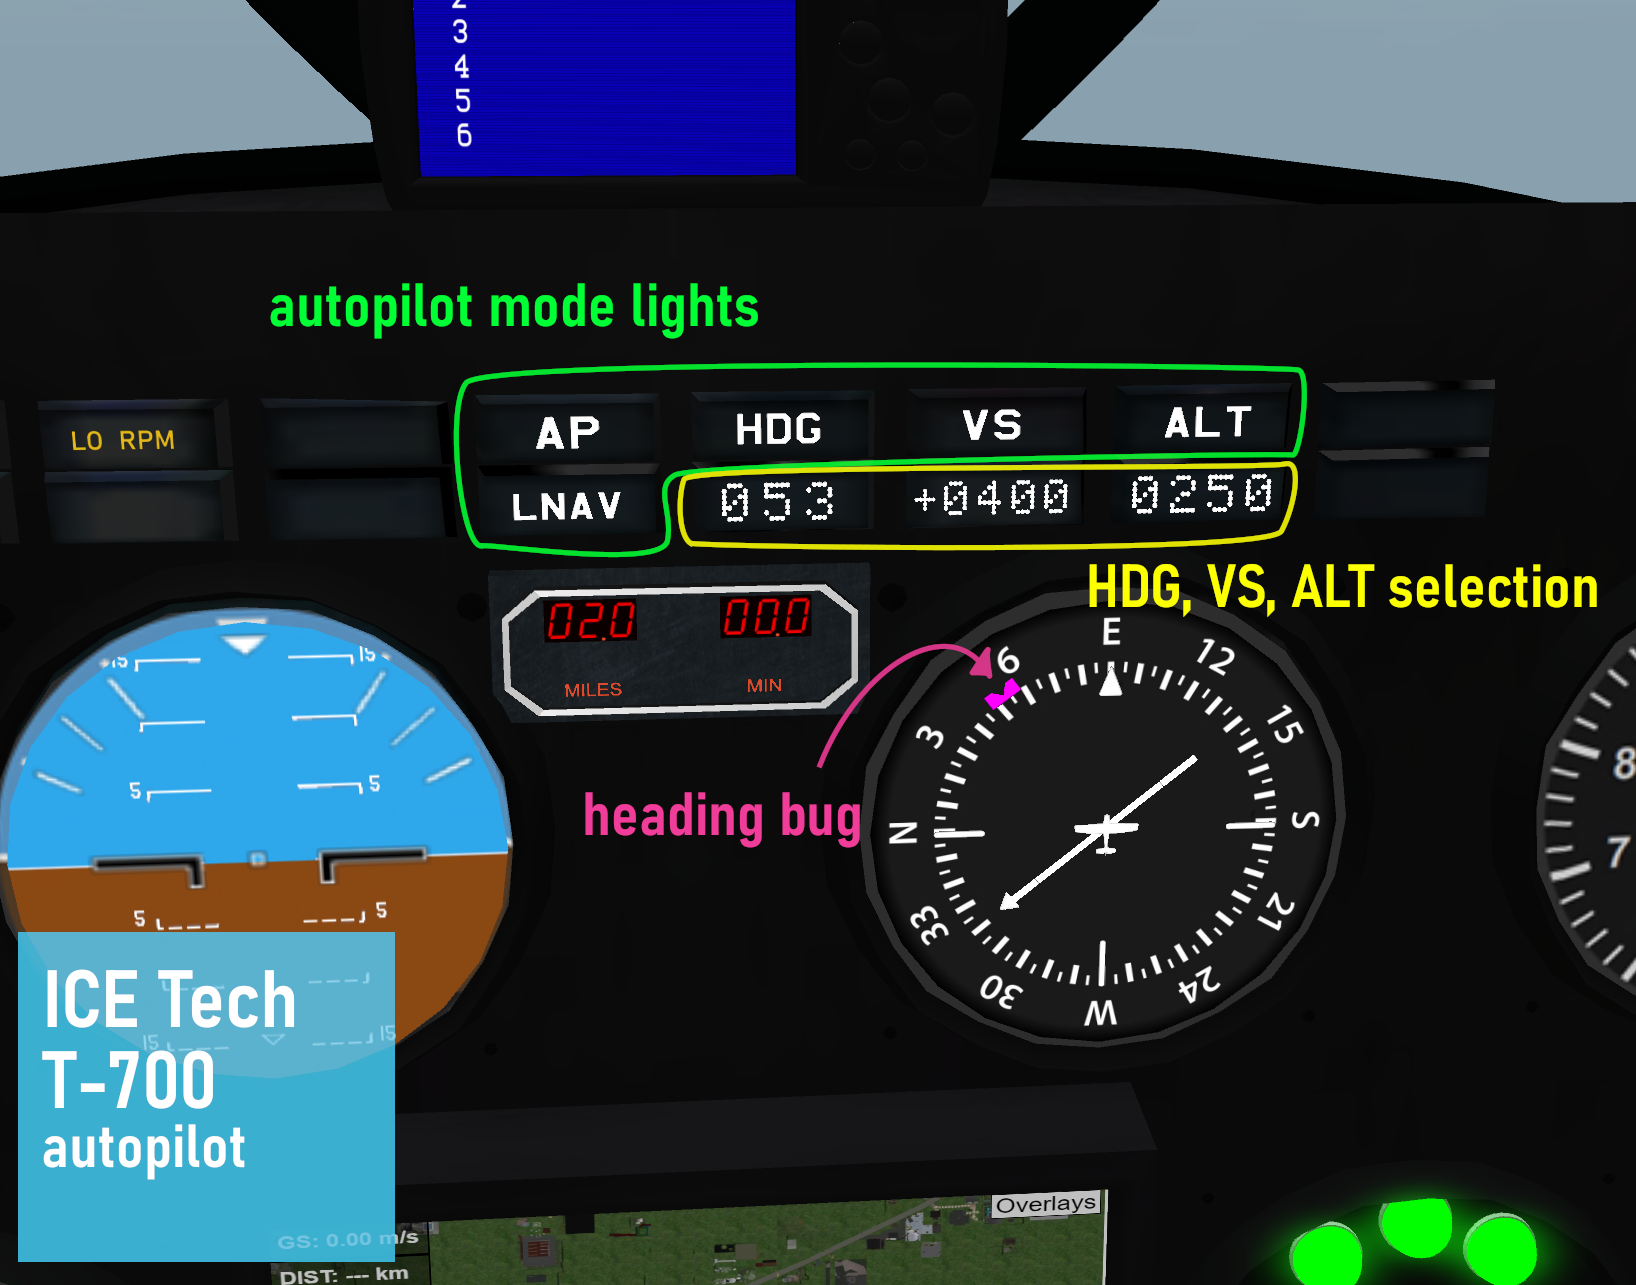
The T-700 v1.4 is equipped with functional Autopilot (AP) servos. The AP panel is located on the dashboard (as in the picture) and displays the various active/inactive modes, as well as the heading (HDG), vertical speed (VS) and altitude (ALT) programmed. When the AP is active (servos coupled), the aircraft's ailerons and elevators will receive input according to the selected AP mode. The various modes and their functionality are discussed below.
-
AP Servos: Coupling/uncoupling the AP servos, simply refers to connecting and disconnecting the AP. When the AP is "on" (connected), it will send input to the aircraft's control surfaces, i.e. it will control the movement of the elevators and ailerons, depending on which Modes are active (see below). When the AP is on, the AP light will turn green on the dashboard panel, while a white AP light indicates that the autopilot is "off" (servos decoupled). Turning the AP off is accompanied by a warning sound to alert the pilot. Note that any of the available HDG, VS, ALT or LNAV modes may be armed independently but only when the AP is coupled, will the AP actually control the aircraft motion. The AP is turned on or off (toggle), simply using the chat command ap. Alternatively, one may use the provided gesture (by default, SHIFT+H).
-
HDG Mode: When active, the Heading Mode commands the autopilot to track a requested heading. When this mode is active, the HDG mode light on the dashboard panel will be colored green. When inactive the HDG mode light will remain white. The requested heading programmed into the AP is displayed on the dashboard panel, below the HDG mode light. In the above picture, it reads 053 degrees (north east). There are 2 ways to set a heading. A direct heading can be set easily using local chat commands, in the format hdg XXX, where XXX is the 3-digit heading to be set. For example, to set a heading of 125 degrees, type hdg 125. Note that simply setting a heading into the AP does not necessarily mean that the aircraft will track that specific heading. In order for the aircraft to actually track the given heading, the HDG Mode must be the active mode and the AP Servos must be coupled (i.e. HDG and AP lights green on the dashboard). The HDG mode can be activated or deactivated by simply typing hdg in local chat, or using the provided gesture (by default, 7). The second way to set a desired heading is using the provided gestures (which you may further customize as needed). In the default version of the gestures, the HDG can be incremented and decremented by 1 degree, by pressing the "," and "." keys, corresponding to the HDG+ and HDG- gestures, respectively. Similarly, for faster changes of the selected heading by 5 degrees at a time, one may use the gestures named HDG++ and HDG--, which (by default) trigger by pressing the "<" and ">" keys (i.e. with SHIFT key pressed). Setting or changing the requested heading also affects the magenta heading bug in the HSI. This is very convenient for guiding the aircraft to avoid sim corners. The aircraft airspeed should also be taken into account, when executing turns in HDG mode. Clearly, higher airspeeds mean that the aircraf will trace arcs (or circles) or larger radius and, similarly, tigher turns (smaller radius) can be expected at lower airspeed.
-
VS Mode: The Vertical Speed Mode controls the aircraft's climb or descent at the preset vertical speed. When the mode is active, the VS mode light on the dashboard panel will be colored green, while when inactive the VS mode light will remain white. The requested vertical speed programmed into the AP is displayed on the dashboard panel, below the VS mode light, in fpm's (feet per minute). Positive values correspond to climb, while negative values correspond to descent. Recall that the T-700 has no autothrottle feature, which implies that manual throttle corrections may be needed, in order to maintain a given airspeed (there is no airspeed hold mode either). Typically, additional throttle input will be required during climb, and conversely for descent. Setting a vertical speed may again be done in two ways. The direct way to enter a desired vertical speed in local chat is the format vs #####, with ##### being the vertical speed in fpm. For example to set a climb rate at 1000 fpm's, type vs 1000. Similarly, to set a descent rate at 500 fpm's type vs -500. More conveniently, vertical speed can be changed using the provided gestures (which may be further customized as needed). By default, the gestures named VS+ and VS- will respectively increase and decrease the the vertical speed in steps of 50. Note that simply setting a vertical speed value in the autopilot does not automatically imply that the aircraft will initiate a climb or a descent at the given rate. The VS mode will only actually climb/descend the aircraft when active and provided the AP servos are coupled (i.e. green AP and VS lights on the dashboard). The VS mode can be activated or deactivated by typing vs in local chat, or using the provided gesture (by default, 8).
-
ALT Mode: The Altitude Select Mode can be used, together with the VS mode, in order to climb or descend to a desired altitude. When active, the ALT mode light will turn green on the dashboard panel, while a white light indicates that the ALT mode is inactive. Note that the ALT mode is not a simple altitude holding mode and will not just hold the current altitude, nor will it initiate a climb or descent on its own to the preset altitude. For simplicity and convenience, the altitude used in this mode is the absolute SL altitude, namely the z-coordinate of the aircraft. Let us assume that the aircraft is flying at 150 meters of altitude and the pilot wishes to climb and maintain a new altitute of 250. First, the new altitude must be set, either using the local chat command alt 250, or using the provided ALT+ and ALT- gestures (by default, "=" and "-). The preset altitude will appear in the AP dashboard panel, directly below the ALT mode button. To activate (or deactivate) the ALT Select mode, use the local chat command alt, or use the provided gesture (by default "9"). To actually initiate the climb, the pilot should use the VS mode by selecting a vertical speed for the climb, and activate the VS mode. If the AP servos are coupled, the aircraft will begin its climb at the selected vertical speed. If during this climb, the aircraft reaches the selected altitude and the ALT mode is active, the altitude alert buzzer will briefly sound and the aircraft will "capture" and hold the selected altitude. In other words, the ALT mode will cause the aircraft to interrupt the climb and maintain the preset altitude. Descent works in a similar way. Note, that setting an altitude and climbing towards it using the VS mode but with an inactive ALT mode, will cause the aircraft to continue to climb past the preset altitude. Furthermore, selecting an altitude and activating the ALT Mode will only capture and hold the selected altitude if the aircraft reaches the desired altitude using the VS mode.
-
LNAV Mode: The Lateral Navigation (LNAV) Mode can be used to track GPS waypoints programmed into the FMS (see the FMS & Instrument Flight section above). Provided waypoints are programmed into the FMS, activating the LNAV mode (with AP Servos coupled) will cause the aircraft to track the active waypoint. To activate/deactivate the LNAV Mode, simply type lnav in local chat, or use the provided gesture (by default "6"). Special care should be given to properly program the waypoints in the FMS as well as in picking the throttle setting, in order to anticipate the turns of the aircraft and avoid sim corners. In LNAV mode, the aircraft will turn at a roll angle of up to 40 degrees, and can avoid sim corners reasonably well, albeit LNAV has no special corner-avoidance logic. In level flight, a cruise power of 55%-60% can perform turns reasonably well and -in most cases- avoid sim corners, provided the FMS waypoints are chosen wisely. At any moment of LNAV flight, the pilot can easily switch to HDG Mode to "correct" a turn, and then reactivate LNAV as required (this is most easily done using the provided gestures).
-
APPR Mode: The Approach (APPR) Mode can be used for precision CAT I ILS approaches, particularly during IFR conditions (for instance, low visibility). It involves both lateral alignment with the runway as well as vertical descent following the correct glideslope for the airfield. The APPR mode arms automatically, provided certain conditions are met during the approach (see below). As with other autopilot modes, the APPR mode will only control the aircraft provided the AP Servos are coupled. Note that the APPR mode is NOT an autoland mode, i.e. the aircraft will NOT flare nor touchdown on its own. Instead, when active the APPR mode will capture the localizer at the destination airfield for alignment with the runway during the approach, as well as the glideslope and establish the aircraft into a stablized approach. The aircraft AP MUST be turned off during final (at or above minimums), and the last part of landing until touchdown is to be handflown, including the flare. In order for the APPR mode to arm:
the destination airfield and a valid approach must be programmed into the FMS and be the active waypoint
AP Servos, LNAV and VS Modes must be active
ALT Mode must be inactive (for glideslope capture, otherwise the aircraft will only laterally align to the runway)
the aircraft should be within 5 sims distance from the destination airfield and have the airfield within its forward 45 degree cone (i.e. not flying away from the airfield)
the runway heading and the aircraft heading should not be off by more than 90 degrees
the aircraft must initially fly at an altitude below glideslope (to allow the glideslope diamond in the HSI to be captured)
hundred above: given 100 feet above minimums
minimums: at the decision height; for CAT I approaches AP Servos should be disconnected at this point; if the pilot has no visual on the runway, a go-around following a missed approach should be executed
one hundred: given 100 feet above the runway elevation
fifty: given 50 feet above runway elevation (power should be ideally reduced to 40% if not already done so)
forty: given 40 feet above runway elevation
thirty: given 30 feet above runway elevation
twenty: given 20 feet above runway elevation; initiate the flare (set pitch around 2.5 to 5 degrees above the horizon and let the aircraft touch down on its own)
ten: given 10 feet above runway elevation
five: given 5 feet above runway elevation; touchdown is imminent
Fueling
The T-700 currently supports 2 options for fueling:
-
Simple refuling by the chat command "refuel". This will top the tank. Ensure the aircraft engine is off.
-
Using SA "KellyFuel" pump v3.1. Park the aircraft close to the pump, engines off. Click the pump to detect the aircraft. Be sure to ground the aircraft first! Open the fuel filler cap on the right wing, and attach the pump (JPA). Follow the instructions on the pump screen. More information on KellyFuel can be found in the Shergood webpage.
Annunciator panel & Failures
The T-700 annunciator panel contains six (6) warning lights, as shown in the legend below:
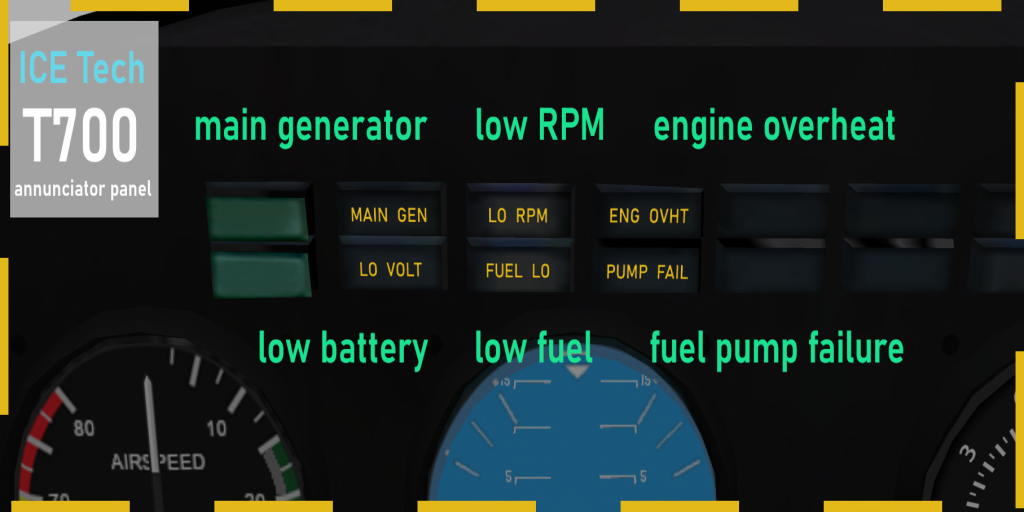
MAIN GEN: The main generator is not providing electric power and the battery is being used instead. This occurs if the engine is not running, and can bleed off the battery, unless external power is connected (ground only). This light should be extinguished in normal engine operation.
LO VOLT: Indicates that the battery has dropped below 15V. Monitor DC battery gauge (Volts). Below 10V, most electrical systems will fail to operate.
LO RPM: Low engine RPMs. This light should be extinguished in normal engine operation.
FUEL LO: Fuel tank has less than 15% fuel left.
ENG OVHT: Monitor ITT gauge during flight. If ITT exceeds limits for extended time intervals, the engine overheat light will illuminate. Reduce power (and ITT) immediately. If the overheat light does not extinguish soon after ITT reduction, arrange to land as soon as possible for engine inspection and repairs. If the engine overheat light remains illuminated, or if ITT continues to exceed operational limits, the engine may fail during flight.
PUMP FAIL: Will illuminate in case of fuel pump failure. This may occur if the fuel tank is filled with the wrong fuel type. If this light is illuminated, land as soon as possible and inspect/repair the aircraft once on the ground. A failure in the fuel pump may lead to engine failure.
Flight Characteristics & Notes
Aircraft weight due to fuel is not fully simulated. Aircraft weight due to seated avatars is simulated. Weight due to cargo is not simulated by default. The user may choose to manually simulate the change in the center of gravity (CG) and the change in the weight of the aircraft, by turning on the physics to some or all of the 18 CARGO links, but this will significantly affect flight behavior.
The aircraft stalls by angle-of-attack (AOA). The critical value depends on configuration and ranges between 10-15 degrees. Stall speed (V_s) is approximately 21 knots.
VR (Rotation airspeed) is approximately 30 knots with flaps extended. Monitor airspeed during your takeoff roll and rotate (gently pull back on the stick) as soon as airspeed exceeds 30 knots.
VREF (reference airspeed for final approach) is approximately 31 knots.
Flap extension affects drag and lift. Gear extension affects drag as well. You will see a noticeable effect on airspeed.
Rolling the aircraft causes the lift vector to deviate from the vertical direction and no longer fully balances the aircraft weight. This may result in loss of altitude. The effect may appear more noticeable at lower airspeeds. Consider slight upwards pitch during banked turns, as required.
The aircraft is NOT certified for aerobatics. Avoid excessive banking (more than 45 degree rolls), steep dives or climbs (more than 30 degrees up or down pitch). Voluntary spins are not authorized in this aircraft.
A pre-stall buffet warning horn will sound in the form of a series of repeated short "pulses", whenever a stall is imminent. Take swift action to lower the nose and reduce the AOA, in order to avoid the stall.
In case of stall, the stall horn (continuous sound) will sound. To recover, push the stick forward (i.e. down pitch). Your goal is to bring the nose to align with velocity (more precisely, to reduce AOA). Throttle up and stabilize the aircraft to wings level. Do NOT practice stalls at low altitude.
The aircraft can enter a spin by rudder input during a stall. Throttle down to idle. Wait for the nose to drop towards the velocity and start stabilizing in the vertical. Apply opposite rudder to the direction of the spin, then add power and stabilize the aircraft to wings level. The ability to recover from an involuntary spin highly depends on the initial altitude.
Oftentimes lag durin sim crossings requires avatars to stand and resit. The toggle command ph has been added to turn the aircraft physical/unphysical.
Normal Operations
In addition to the following notes, use the checklist to ensure proper aircraft configuration for the various stages.Normal Takeoff
Check your lineup using the HSI compass. Check flaps extended. Set takeoff power to 90-100% throttle. Monitor airspeed and rotate at or above 30 knots. Gently raise the nose to +5 degrees pitch, then gradually to around +10 or +15 degrees pitch.
Upon establishing a positive rate of climb (vertical speed above 500 fpm), raise the landing gear. Retract flaps above 35 knots. Set climb power to around 65-70%. Monitor airspeed and adjust pitch and throttle accordingly.
Normal Approach (Visual Straight-in)
Start at throttle 55%, wings level, gear down, flaps extended, at an initial altitude of 50-70 meters AGL (above runway elevation).
Line up early. About one sim before the runway, enter the glide path (i.e. start descent on final approach). Reduce throttle to 40-45%, as required. Aim for the runway numbers (or a little before), i.e. bring the runway numbers just above the bottom of the glare-shield. Your approach should be at a slight nose down attitude, and around 30 knots. Excessive negative pitch will considerably increase airspeed, so power down accordingly and attempt to establish a stabilized approach (constant pitch, constant power setting, constant airspeed).
The optimal glideslope for this aircraft is around 8 degrees. If you are too steep, you will have excess airspeed that will be harder to bleed off and might balloon later on and have a "long landing". If you are too shallow, you might stall on flare. Remember: high and fast is better than low and slow. If you think you aren't coming in correctly for the approach, wave off and try it again - no shame in that.
If you are correctly stabilized for approach, you will normally NOT need to cut power for landing (that is, if your airspeed on final approach is stable at around 30 knots). If you drop power under those conditions, cutting power completely may result in sudden loss of altitude (and if you pull up suddenly or too hard, you might stall it). If you are at the correct airspeed but too high, drop power slightly and only for as long as needed. If you are below glideslope, consider adding some power for a bit and adjust as needed. If you are descending too fast, reduce power and slightly lift the nose. If you are too too slow, add power slightly and slightly lower the nose. But aim to be around 40-50% power during final.
Adjust pitch in order to keep aiming for the runway numbers. If all goes well you will reach the runway threshold at a height of about 20-30 feet (~10 meters). If needed, cut power to 40-45% throttle, and start your flare, i.e. gently pull the nose up slightly above the horizon around 2.5 to 5 degrees of pitch, and keep it there. This will reduce your vertical speed, and bleed off some airspeed so that the aircraft will touch down on its own, with its mean gear first. Avoid nose first landings, as you can be pretty sure it would rip off the nose gear, break the propeller, and cause structural damage to the aircraft. If your descent rate is too big, you can reduce some of the vertical speed and soften your touchdown if you slightly add some power during the flare, just before touchdown - however, adding too much may balloon it or lead to a long landing, so avoid adding power just prior to touchdown if your airspeed is more than 30 knots.
If you're slightly high and your flare balloons it, cut some more power down to 40% or even 35% for a short amount of time, as required.
Emergency Procedures
The T-700 does not have a random failures option, but failures can occur as a result of the pilot's actions. Those can be turned off by the chat command input "failures". The most common failures are either due to incorrect fuel being fed into the tank, due to exceeding engine ITT during flight, or due to hot-starting the engine. The warning/annunciator lights will give an indication of the failure and give the pilot the chance to hopefully land the aircraft in time.
In case of engine failure during flight, the recommended procedure (assuming you have sufficient altitude) is:
With the engine gone, the goal is to glide the aircraft to a nearby airfield for an emergency landing, provided you have sufficient altitude.
Quickly lower the nose below the horizon (ideally 5 to 15 degrees pitch down) as required to maintain airspeed between 30-35 knots. If you stall, you will lose a significant amount of altitude and might be unable to recover on time for a glide. If your flaps were extended, and you have sufficient airspeed (around 30 knots or more), retract them to reduce drag.
After this initial stabilization of the aircraft to maintain airspeed (and some lift), try restarting the engine. This might work or not, and it's worth trying a few times, but don't get so focused on trying to restart the engine to the extent that you will neglect the glide. The engine may fail to restart, so you need to be thinking about the glide.
Starting high enough, you need to balance your descent rate together with your airspeed in order to maintain the glide. Monitor vertical speed and try to limit it to no more than 500 fpms, while simultaneously monitoring airspeed and keeping it sufficiently above stall point (around 30-35 knots is best, with gear down).
Do NOT extend flaps during an emergency (no engine) landing in the T-700. Flap extension will introduce significant drag that will make the glide extremely difficult (extending flaps will require significant nose down attitude to maintain a safe airspeed).
Delay lowering the landing gear until you are on final approach, taking into account that this will bleed off some of your airspeed due to drag.
It is better to be fast than slow for this. To maintain airspeed, you will have to reach the threshold at significant nose down attitude, so your approach will be steeper than usual. Without power, expect the flare to bleed off the extra airspeed quickly, so time your flare with this in mind.
Chat Commands
ck1 - brings up the checklist (page 1)
ck2 - brings up the checklist (page 2)
ck - removes the checklist
bat - batter master on/off switch (toggle)
gpu - ground power unit rez/derezz (toggle)
cl - cockpit instrument lights on/off (toggle)
cab - cabin light on/off (toggle)
nav - position lights on/off (toggle)
strobe - anticollision lights on/off (toggle)
s - engine starter/cutoff switch (toggle)
start - starts the engine
stop - stops the engine
f - extends/retracts flaps (toggle)
g - raises/lowers landing gear (toggle)
stall - enables/disables stall & spin effects (toggle)
failures - enables/disables failures (toggle)
ll - landing lights on/off (toggle)
br - park brake (when on the ground) and spoilers/airbrakes (when airborne)
ph - turns plane physical/unphysical (toggle)
copilot - passes controls to right seat pilot
pilot - passes controls to left seat pilot
senX - sets aileron sensitivity between 1 and 100% (i.e. X is a number between 1 and 100)
gps - GPS/transponder and FMS switch on/off (toggle)
gps zX - GPS map zoom level X (where X=1,2,3,4, default is 3)
gps sqXXXX - set transponder squawk to XXXX (eg. 1200 for VFR)
gps reload - reloads GPS map
plan [WPT1], [WPT2], ... - programs waypoints and approaches into the FMS (see FMS & Instrument Flight)
wpt next - sets the next waypoint in the flight plan as the active one
wpt dto # - direct to the waypoint number # in the flight plan
wpt del # - deletes waypoint number # in the flight plan
wpt add XXXX # - adds new waypoint with code XXXX into the flightplan after waypoint number #
p# - displays FMS flight plan page number #
ils off - clears FMS flight plan and VOR/ILS link
vor off - clears FMS flight plan and VOR/ILS link
ap - activates/deactivates the autopilot servos (toggle)
hdg - arms/disarms the autopilot Heading Track mode (toggle)
vs - arms/disarms the autopilot Vertical Speed mode (toggle)
alt - arms/disarms the autopilot Altitude Select mode (toggle)
lnav - arms/disarms the autopilot Lateral Navigation (LNAV) mode (toggle)
hdg # - sets new heading # to the autopilot Heading Track mode
vs # - sets new vertical speed # (in fpms) to the autopilot Vertical Speed mode
alt # - sets new altitude # (in SL meters) to the autopilot Altitude Select mode
chrono start - starts the aircraft chronometer
chrono stop - stops the aircraft chronometer
chrono reset - resets the aircraft chronometer
refuel - refuels the aircraft (engine needs to be off)
repair - repairs all damage to the aircraft (ground only)
register - allows the user to set their own N-number (owner only - please reset all scripts BEFORE using)
cargo - switches between passenger and cargo mode (pilot only, toggle)
seat - opens the seat adjust menu (pilot & copilot only)
guest - turns guest mode on/off (toggle)
ej - brings up the passenger kick menu (owner only)
hud - gives the instrument HUD
Acknowledgements
Special thanks go to:
- Celine Blackwing (dalia.thei)
- Ernesto Castillo (johnny.bloodrose)
- Jessica Cerridwen (jess.viertz)
- Phoenixx Darkheart
- Lethra
- Sophia Laveau (sophia.macabre)
- Chester McFisticuffs (l1ghtsh0wz3n)
- Connie Mistwalker
- Astoria Orleans (astoriaorleans)
- Amara Quandry
as well as to Luke Flywalker and Salina Warwick for their incredible support, and especially to Kelly Shergood (Shergood Aviation) for her invaluable help and advice.